plugins是一个插件,里面自己定义的规则(写法规则)和处理器(处理不同类型的文件)等等。
下面创建最基础简单的规则作为样例。
Tips
- ESLint 默认对 js 进行处理,JSON 或其他格式的文件需要配置插件。
- 脚本命令
"scripts": {
    "lint": "eslint .",
	"lint:fix": "eslint --fix --ext .js,.jsx ."
},- 重启 ESLint
Shift+Ctrl+P+ESLint: Restart ESLint Server
🌸自定义 Rules
Yeoman 生成器 - 官方推荐使用的创建器
1.安装脚手架依赖
npm i -g yo
npm i -g generator-eslint
yo eslint:plugin
yo eslint:rule
2.创建插件包文件夹
mkdir eslint-config
cd eslint-config
3.使用脚手架创建 Plugin 和 Rule
# 创建插件,会填一些配置项
yo eslint:plugin
# 创建规则,也会填一些配置项
yo eslint:rule
使用 yo eslint:plugin 创建插件:
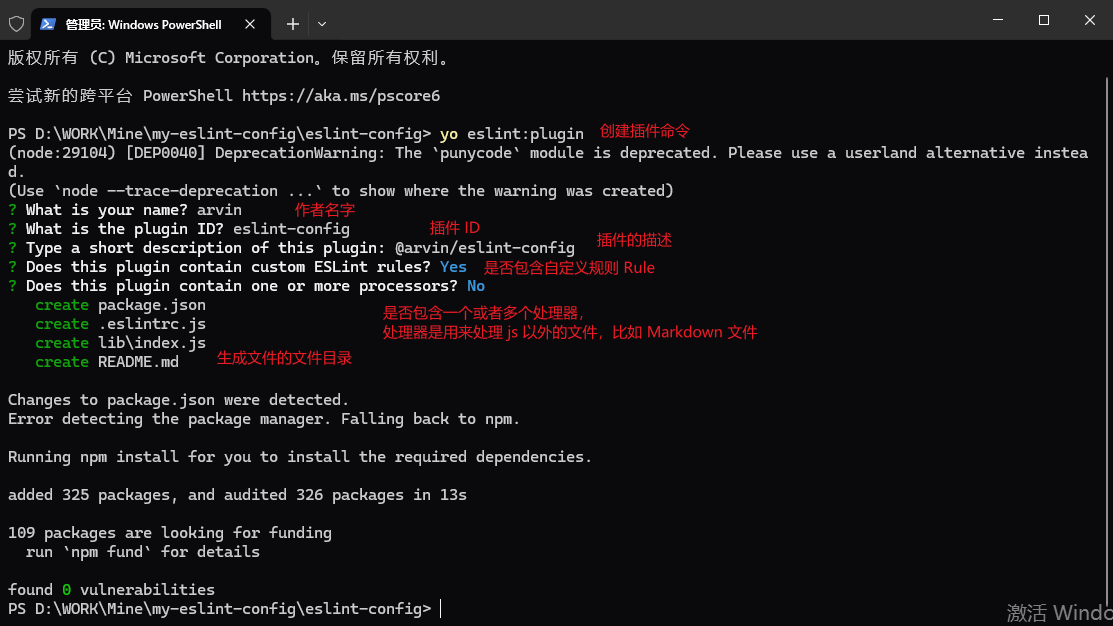
a. 使用 VsCode 打开文件夹
code .b. 打开 package.json 更改一下 name 和 description。 这里的名字需要 eslint-config 开头。
{
  "name": "eslint-plugin-custom",
  "version": "0.0.0",
  "description": "arvin's eslint-config"
}
c. 文件目录介绍
lib/rules文件夹下写规则lib/index.js规则导出及配置项tests/lib/rules文件夹下写测试
使用 yo eslint:rule 创建规则:
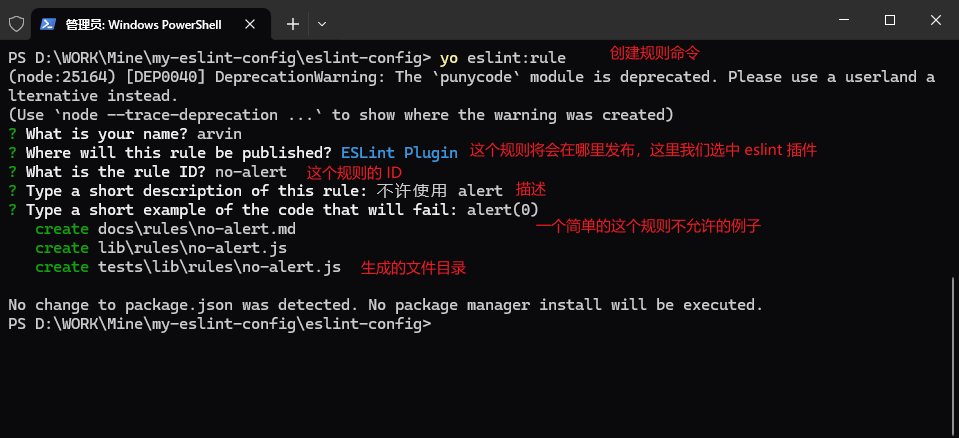
a. 生成的文件目录
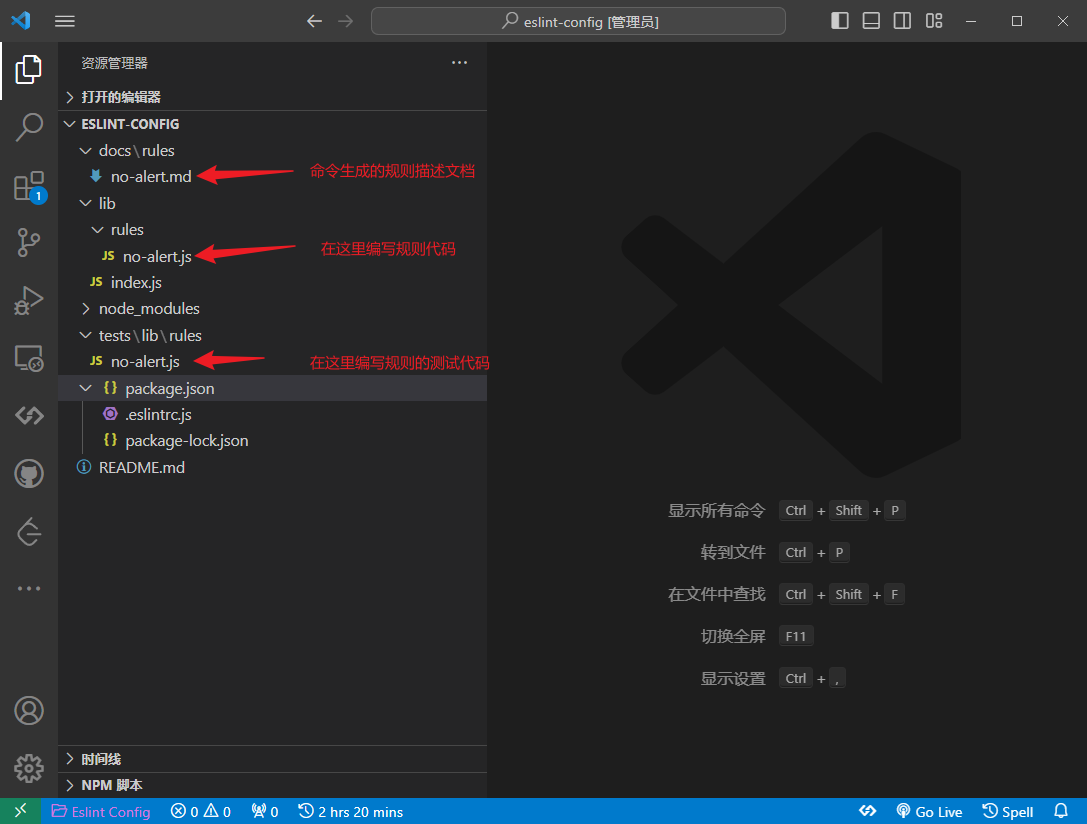
b. 打开要开发的规则文件代码看看
发现报红色提示
`meta.messages` must contain at least one violation message.eslint[eslint-plugin/prefer-message-ids](https://github.com/eslint-community/eslint-plugin-eslint-plugin/tree/HEAD/docs/rules/prefer-message-ids.md)其实就是缺少 message 提示,到打开提示的链接,到官网拷贝代码过来就好了。
c. 开始编写测试用例代码
/**
 * @fileoverview 不许使用 alert
 * @author arvin
 */
'use strict'

// ------------
// 引入规则
// ------------
const rule = require('../../../lib/rules/no-alert')
const RuleTester = require('eslint').RuleTester

// ------------------------------------------------------------------------------
// 测试
// ------------------------------------------------------------------------------

const ruleTester = new RuleTester()

// ------------
// 引入提示信息,就是上一步引入的。这里其实随便写都可以,只要最后能过测试用例!
// ------------
const [MESSAGE_ID_DEFAULT] = Object.keys(rule.meta.messages)

ruleTester.run('no-alert', rule, {
  valid: [],
  invalid: [
    {
      code: 'alert(0)',
      errors: [{ messageId: MESSAGE_ID_DEFAULT }],
    },
  ],
})
d. 准备编写规则 Rule 代码 测试用例已经写了一个,alert(0)是报错的,接下来就是要在 Rule 代码中实现。
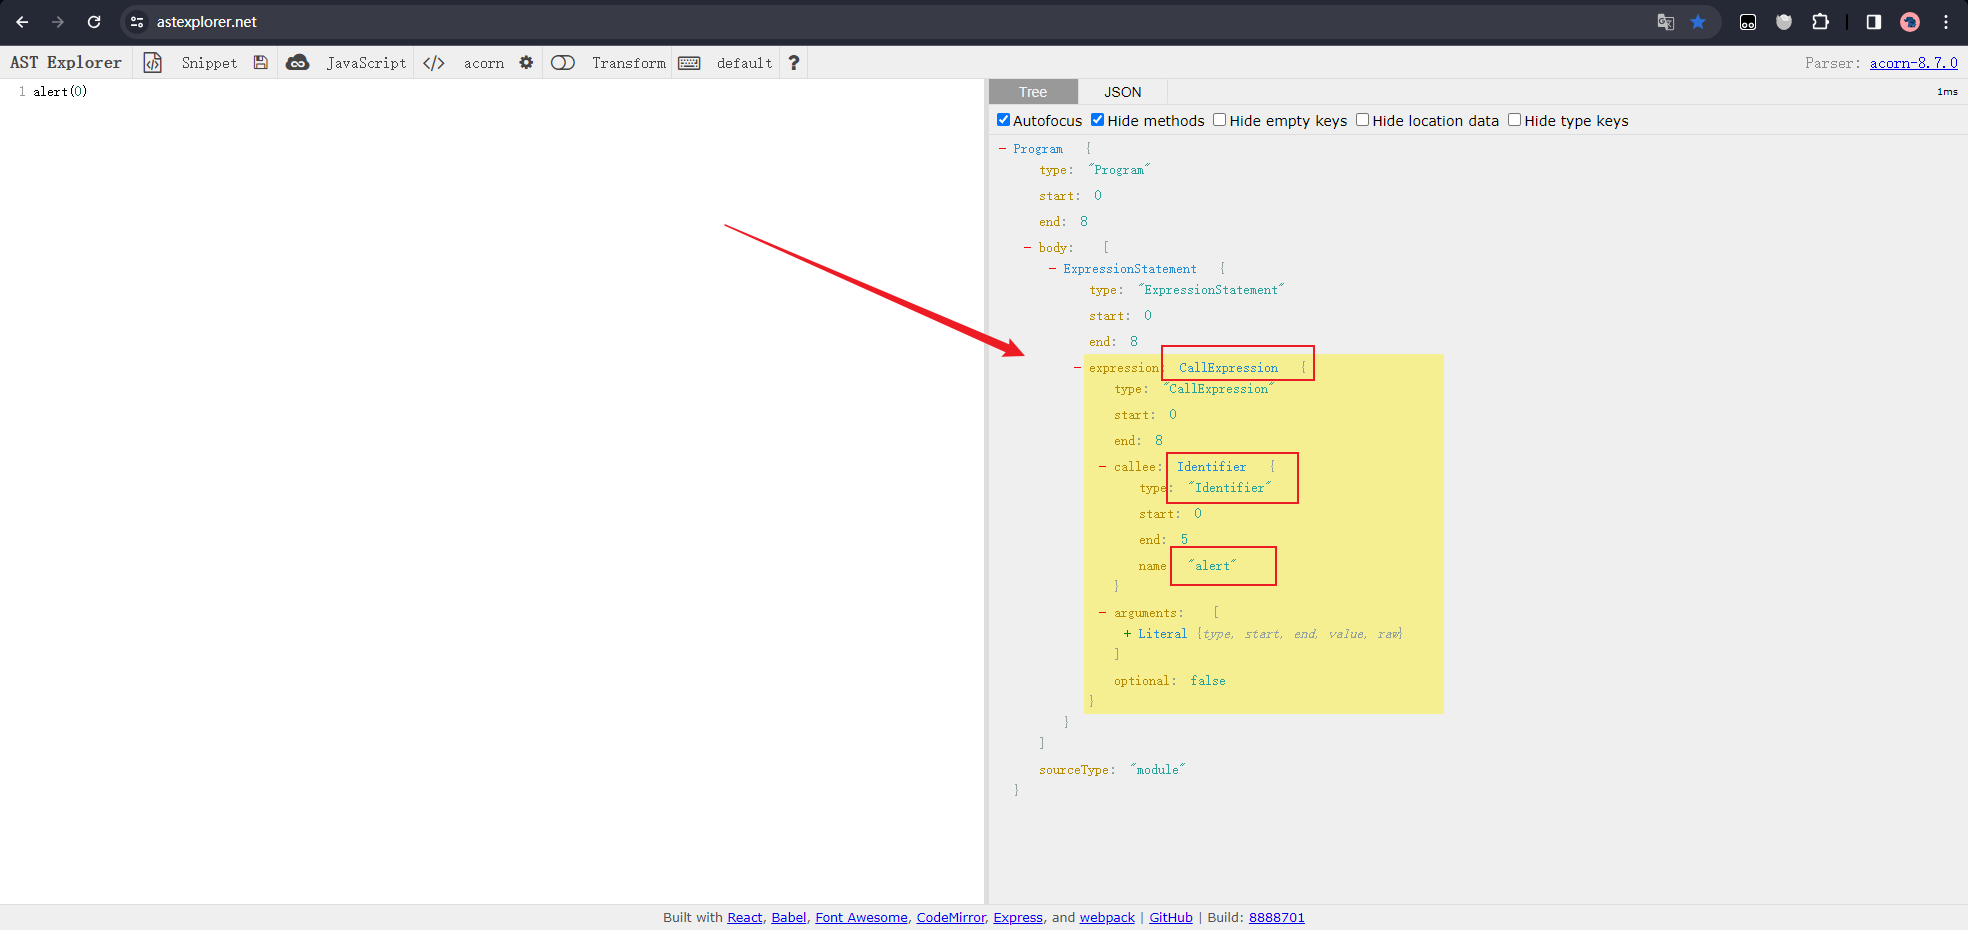
由上面AST分析器可知,alert会在这里触发。于是开始调试代码。其实在使用脚手架创建项目的时候,已经安装了调试代码的依赖,就是 mocha 这个包。
调试代码
- Vscode 进入调试 JS 模式
- 打断点
- 运行命令调试
- 会发现变量跟上面 astexplorer 的结构都一样,那么下面就好写了
打断点调试: 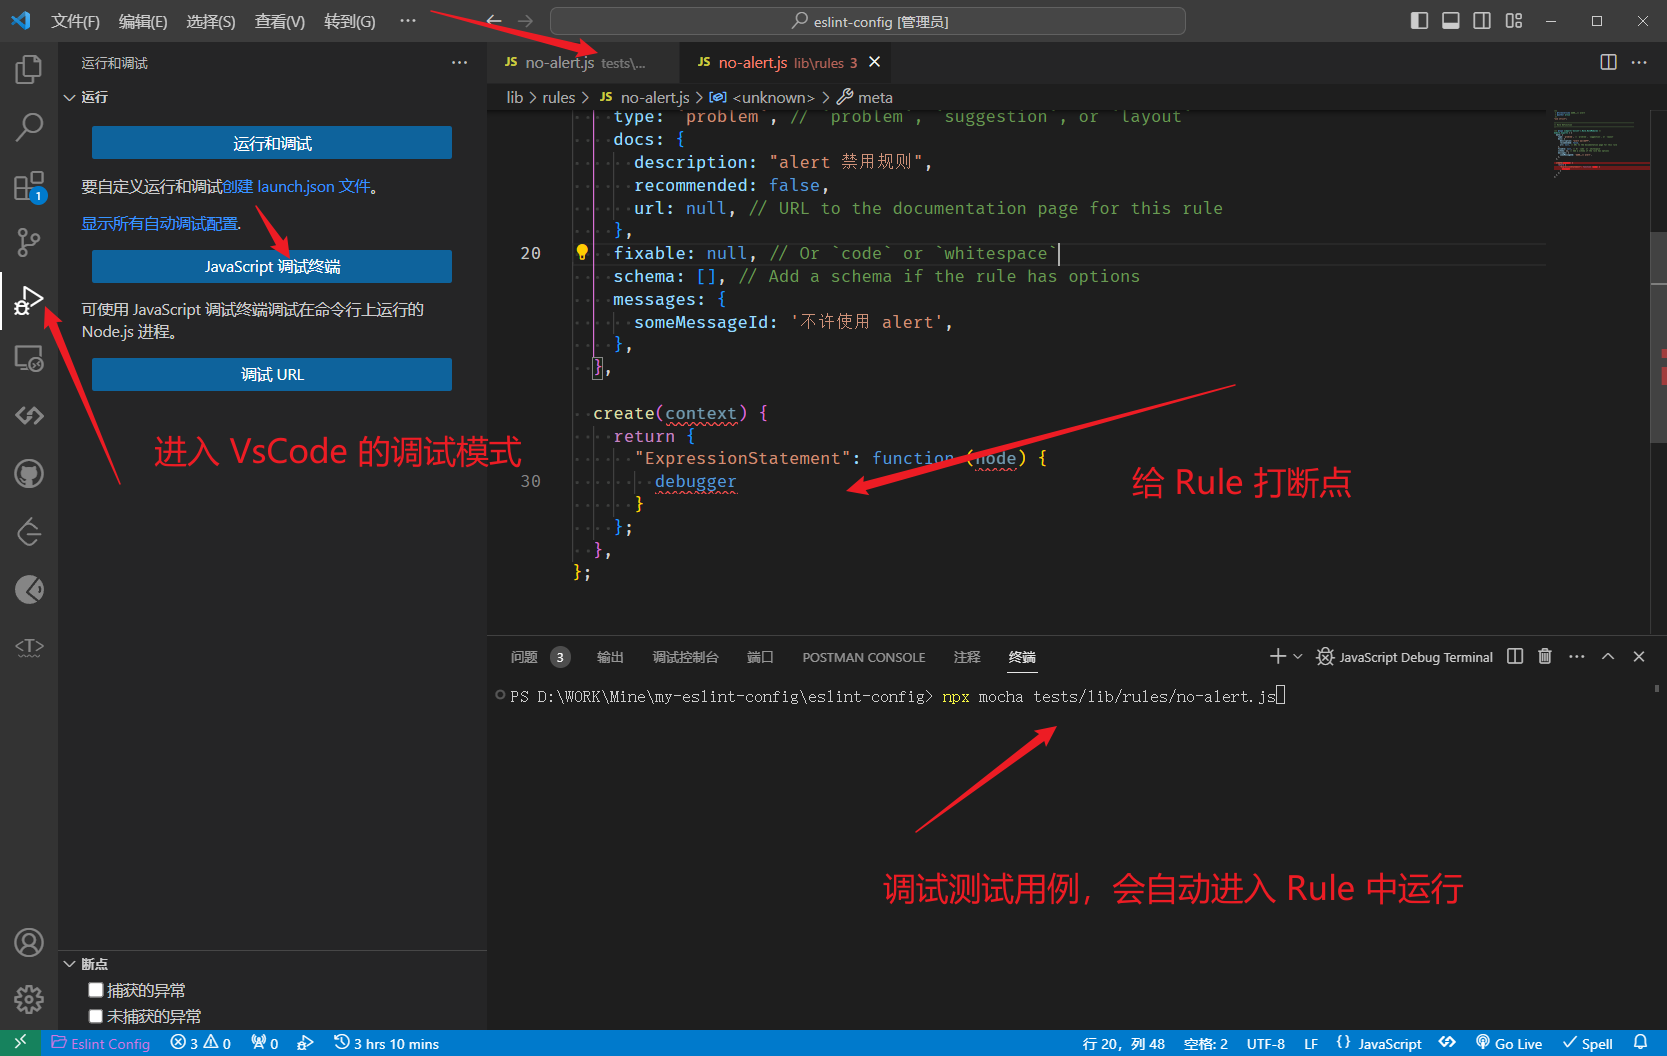
变量: 
e. 继续开发 Rule 代码
/**
 * @fileoverview 不许使用 alert
 * @author arvin
 */
'use strict'

// ------------------------------------------------------------------------------
// Rule Definition
// ------------------------------------------------------------------------------

/** @type {import('eslint').Rule.RuleModule} */
module.exports = {
  meta: {
    type: `problem`, // `problem`, `suggestion`, or `layout`
    docs: {
      description: 'alert 禁用规则',
      recommended: false,
      url: null, // URL to the documentation page for this rule
    },
    fixable: null, // Or `code` or `whitespace`
    schema: [], // Add a schema if the rule has options
    messages: {
      someMessageId: '不许使用 alert',
    },
  },

  create(context) {
    return {
      ExpressionStatement(node) {
        if (node.expression.callee.name === 'alert')
          console.log('有 alert')
      }
    }
  },
}
上面的代码已经完成了80%,运行测试用例,发现是报错的。查看报错信息,绿色是测试期待的输出,红色是实际输出不一致。我们知道测试期待的是有个 messageId 提示。

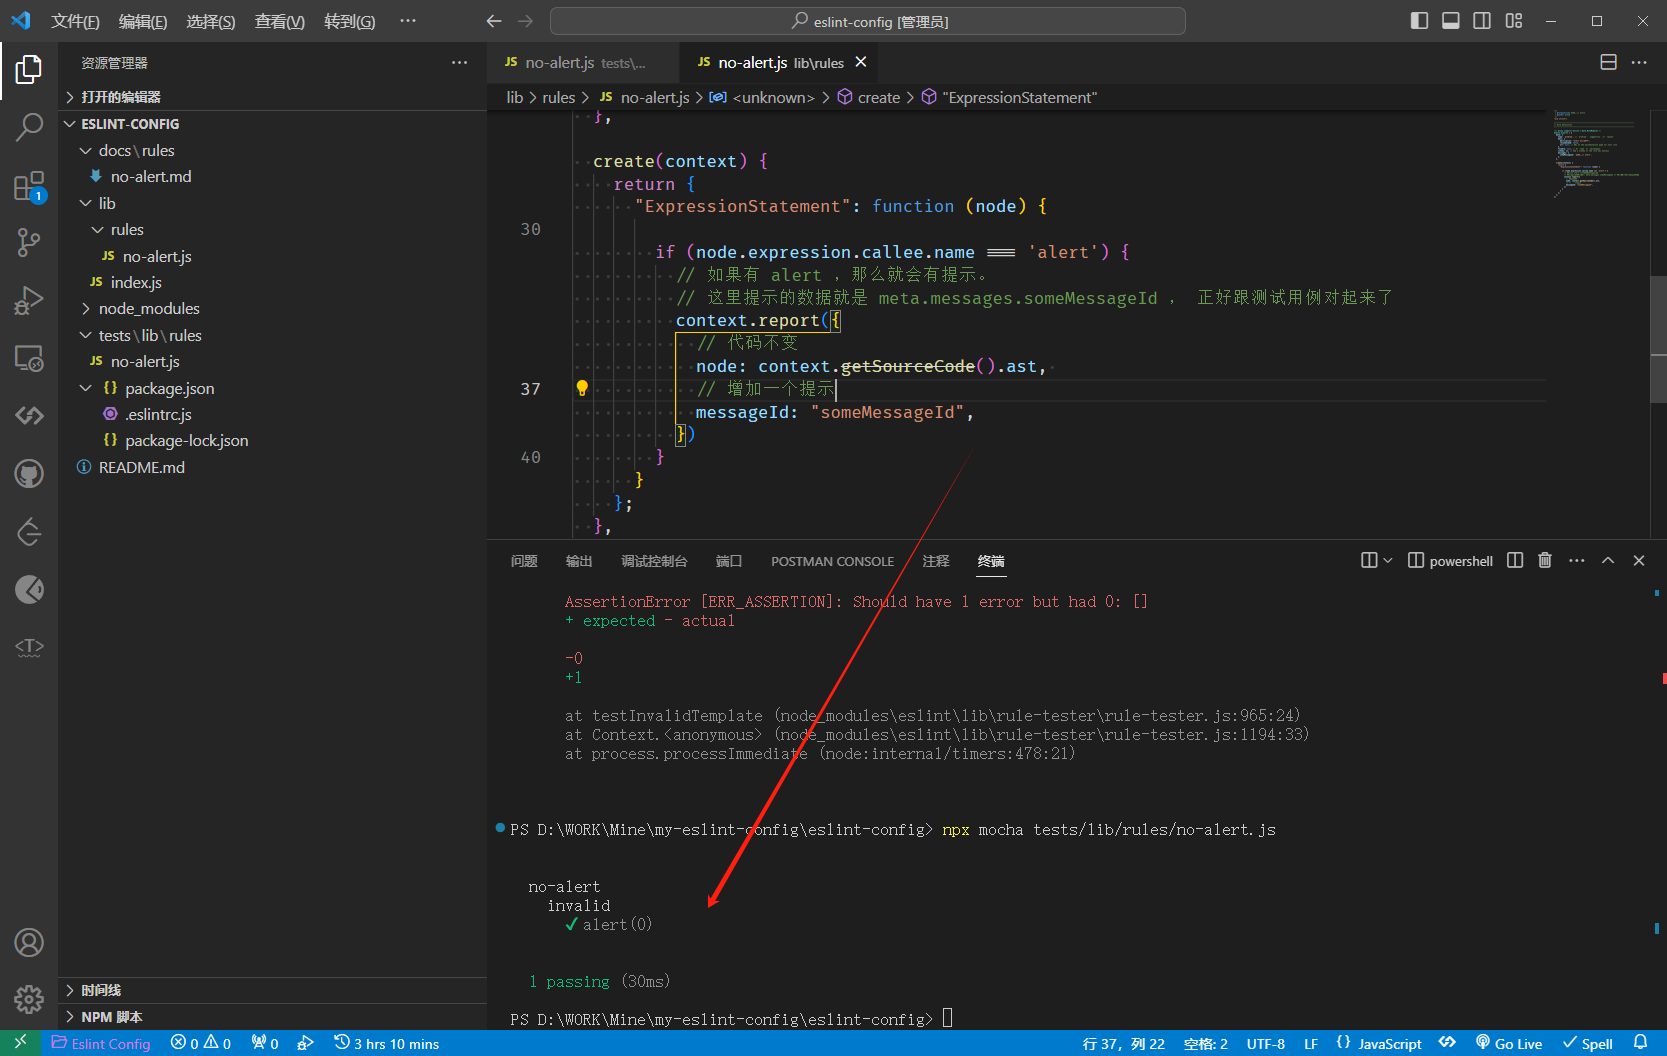
那么我们将代码改一下,再运行测试用例就会发现全部通过了。
if (node.expression.callee.name === 'alert') {
  // 如果有 alert ,那么就会有提示。
  // 这里提示的数据就是 meta.messages.someMessageId , 正好跟测试用例对起来了
  context.report({
    // 代码不变
    node: context.getSourceCode().ast,
    // 增加一个提示
    messageId: 'someMessageId',
  })
}
再创建一条规则:
将变量赋值的 http 使用 https 替换。 有了上面的编码经验,这次就快很多了。
测试用例:
/**
 * @fileoverview 使用 http 替代 https
 * @author arvin
 */
'use strict'

const rule = require('../../../lib/rules/no-http')
const RuleTester = require('eslint').RuleTester

const [MESSAGE_ID_DEFAULT] = Object.keys(rule.meta.messages)

const ruleTester = new RuleTester({ parserOptions: { ecmaVersion: 6 } })
ruleTester.run('no-http', rule, {
  valid: [
    {
      code: 'const server = \'https://127.0.0.1\' \r const server1 = \'https://127.0.0.1\'',
    },
  ],

  invalid: [
    {
      code: 'const server = \'http://127.0.0.2\'',
      output: 'const server = \'https://127.0.0.2\'',
      errors: [{ messageId: MESSAGE_ID_DEFAULT }],
    },
  ],
})
规则:
/**
 * @fileoverview 使用 http 替代 https
 * @author arvin
 */
'use strict'

/** @type {import('eslint').Rule.RuleModule} */
module.exports = {
  meta: {
    type: `problem`, // `problem`, `suggestion`, or `layout`
    docs: {
      description: '不许使用 http',
      recommended: false,
      url: null, // URL to the documentation page for this rule
    },
    fixable: `code`, // Or `code` or `whitespace`
    schema: [], // Add a schema if the rule has options
    messages: {
      someMessageId: '使用 https 替代 http',
    },
  },

  create(context) {
    return {
      VariableDeclaration(node) {
        const originalValue = node.declarations[0].init.raw
        if (originalValue && originalValue.includes('http') && !originalValue.includes('https')) {
          context.report({
            node,
            messageId: 'someMessageId',
            fix: () => {
              const startPosition = node.declarations[0].init.range[0]
              const endPosition = node.declarations[0].init.range[1]
              return {
                range: [startPosition, endPosition],
                text: originalValue.replace('http', 'https')
              }
            },
          })
        }
      }
    }
  },
}
跑测试用例的方法也是跟上面的一样,直接跑通。
以上,就是开发自定义规则的步骤,是很简单的,接下来就是如何应用自己开发的插件。
🌸在项目中使用自定义插件
上面开发的插件如何使用,首先,自然是可以发 npm 包,然后下载使用。但因为我们还是在测试阶段,所以这里自然不太好直接就发包。
1. 新建一个空项目
- 刚才的文件夹根目录,新建一个文件夹
- 进入文件夹
npm init - 安装
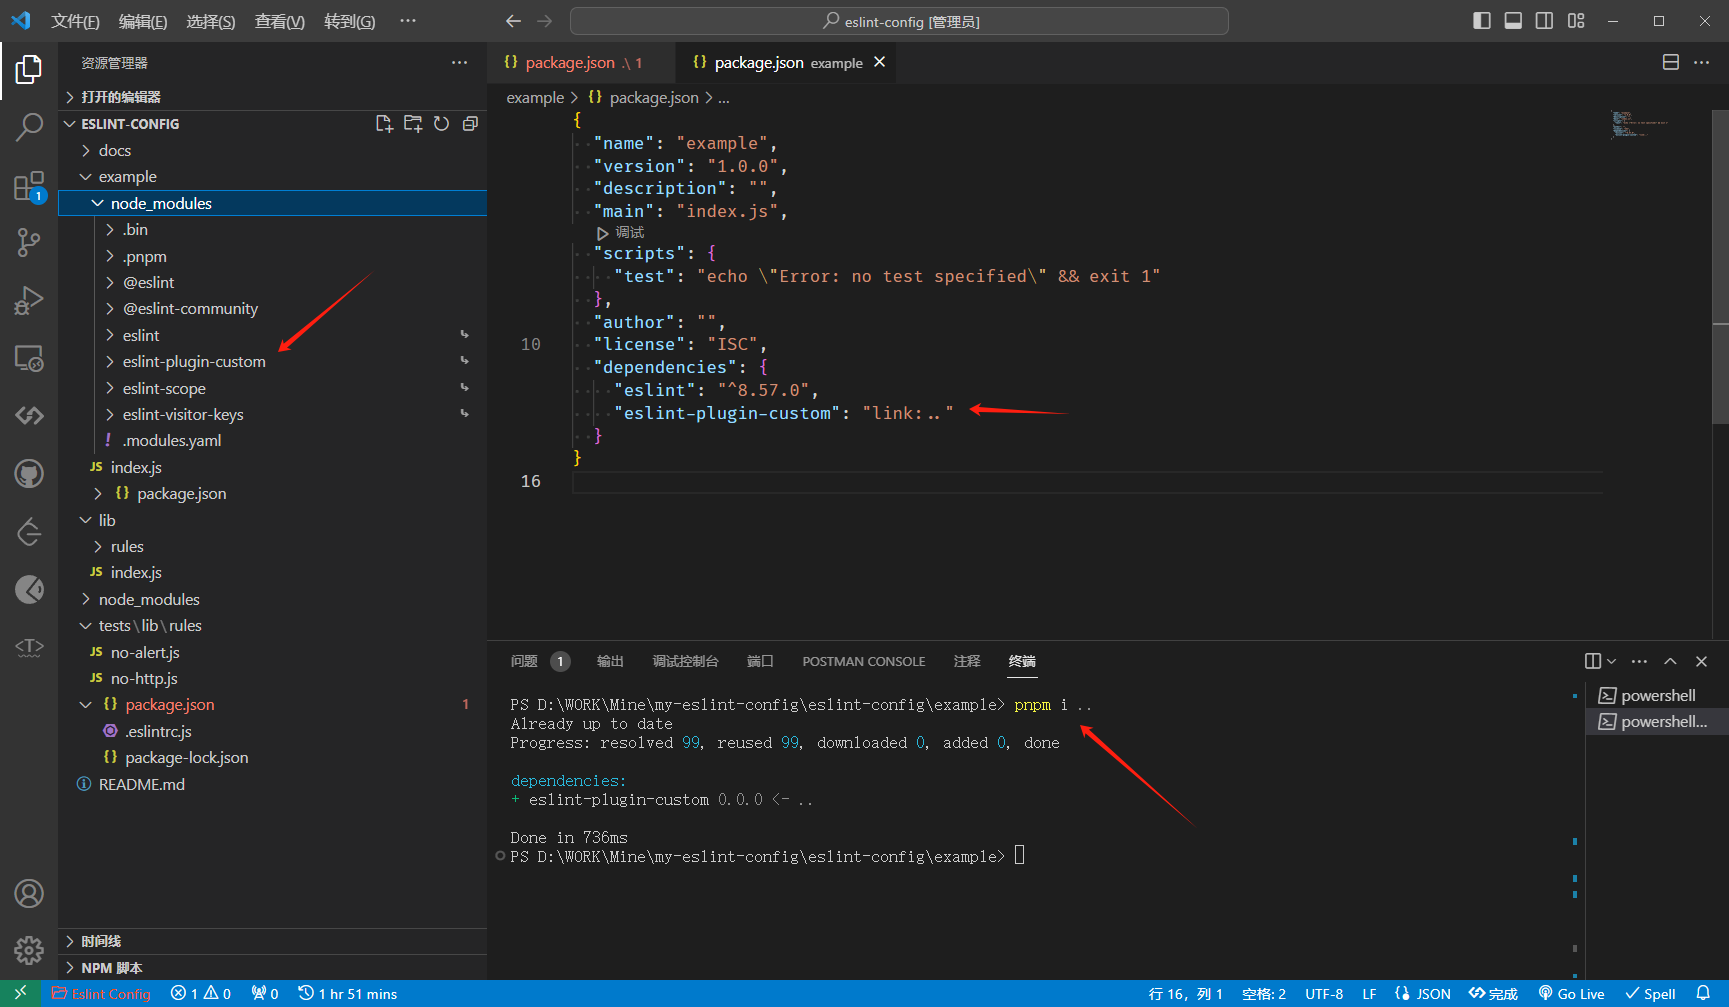
eslint-pnpm i eslint - 安装刚才的依赖包 -
pnpm i ..
这个时候会发现 package.json 中多了一个 "custom-eslint": "link:.." ,而且往 node_modules 中查找 ,发现有刚才自定义的插件文件夹,这就说明自定义的插件包安装成功了。
既然已经安装成功,那么接下来就是如何应用了。
- 在根目录新建文件
.eslintrc.cjs并写入如下代码
module.exports = {
  root: true,
  env: { es6: true },
  plugins: ['custom'], // 将插件名称添加到 plugins 数组中
  rules: {
    'custom/no-http': ['error'],
    'custom/no-alert': ['error'],
  }
}
然后可能需要重启一下 eslint
- ctrl + p
> Eslint: Restart ESLint Server
新建一个测试文件 index.js 并写入:
alert(11)
const server = 'http://127.0.0.2'
如果报红,鼠标 hover 查看是否有自己写的信息提示,如果有的话就说明自定义的规则生效了,保存会自动将const server = 'http://127.0.0.2' 更改为 const server = 'https://127.0.0.2'
2. 简化使用的时候的配置
上面这样使用有个不方便的是,既然已经开发了插件,为何还是需要在项目中引入 plugin 的时候,还需要在下面的 rule 中开启。
下面就简化配置。
- 开发规则
lib\index.js导出的时候,除了导出 rule 外,另外设置 configs.recommended
const requireIndex = require('requireindex')
const rules = requireIndex(`${__dirname}/rules`)
module.exports = {
  // rules是必须的
  rules,
  // 增加configs配置
  configs: {
    // 配置了这个之后,就可以在其他项目中像下面这样使用了
    // extends: ['plugin:custom/recommended']
    recommended: {
      plugins: ['custom'],
      rules: {
        'custom/no-http': ['error'],
      }
    }
  }
}
这里的 recommended 就是可以在使用的时候直接继承使用插件的默认设置,不需要再次设置其是否开启。当然也可以设置覆盖。
- 在使用项目中,这样配置
module.exports = {
  root: true,
  env: { es6: true },
  plugins: ['custom'],
  extends: ['plugin:custom/recommended'],
}
这样就可以直接使用了,先引入插件,后继承使用规则。
🌸 其他
- 使用 eslint-define-config 提供配置的提示,更简单的配置。
const { defineConfig } = require('eslint-define-config')

module.exports = defineConfig({
  root: true,
  env: { es6: true },
  plugins: ['custom'],
  extends: 'plugin:custom/recommended',
})- 定义成 monorepo 项目
- packages/eslint-config 是根配置,用于导出自己的配置
- eslint-plugin 是自己定义的插件
- eslint-config-vue 是自己的 vue eslint配置
- eslint-config-react(eslint-config-xx)同理
- 在跟项目中的 .eslintrc.cjs 可以直接引入 eslint-config 作为自己的 eslint 配置。在 monorepo 项目中,根配置引入 eslint-config ,eslint-config 引入了其它包,但是要是想生效,需要在根目录将 eslint-config 和 eslint-plugin 或者其他包都安装。
比如根目录 .eslintrc.cjs :
"devDependencies": {
	"@arvin/eslint-plugin": "workspace:^",
	"@arvin/eslint-config": "workspace:^"
}
monorepo 项目结构:
esling-config
├─ fixtures // 示例项目
│    ├─ vue // 在 vue 项目中使用自己的 eslint 配置
│    └─ react // 同上
├─ node_modules
├─ packages
│    └─ eslint-config
│           ├─ index.js
│           ├─ package.json
│           └─ README.md
│    └─ eslint-plugin
│           ├─ docs
│           ├─ rules
│           ├─ tests
│           ├─ index.js
│           ├─ package.json
│           └─ README.md
│    └─ eslint-plugin
├─ package.json
├─ package-lock.json
├─ .eslintrc.cjs
├─ .npmrc
├─ .pnpm-lock.yaml
├─ .pnpm-workspace.yaml
└─ README.md- 发包
这里使用 bumpp 快速修改版本号发包
"scripts": {
    "release": "bumpp -c \"release: v%s\" package.json packages/*/package.json && pnpm -r publish"
  },
也可以使用过滤,只发 packages 里面的包
"scripts": {
    "release": "release:packages": "bumpp -c \"release: v%s\" package.json packages/*/package.json && pnpm -r --filter=./packages/* publish"
  }
bumpp -c \"release: v%s\" package.json packages/*/package.json是修改版本号,然后commit tag push等操作。pnpm -r publish递归 packages 内的文件目录,然后对每个子目录执行相同的操作,publish 。--filter=./packages/*过滤遍历操作的目录
不过这里也只需要发一个包就行了
{
  "scripts": {
    "release:eslint-config": "cd packages/eslint-config && bumpp -c \"release: v%s\" package.json && pnpm publish"
  }
}
然后发完包之后,项目中只需要安装使用就行
- npm i @arvinn/eslint-config -d
- 添加到 .eslintrc.cjs ,就可以使用了
const { defineConfig } = require('eslint-define-config')

module.exports = defineConfig({
  root: true,
  extends: '@arvinn',
})